How I Built A Blog
I have updated my blog to use GitHub Actions for Ci/CD, check out this post to learn more!
Why a Post on This?
I have been asked a few times why I decided to build a blog and more importantly, what I did to build a blog that was lightweight, easy to modify (i.e. add posts) and most importantly, is cheap. This is how I approached it, and I understand that some people have more criteria when they look to create a blog, but I am a simple man with simple needs. Remembering the previous version of this blog was an Server-Side rendered Angular 6 application with an ASP.NET Core backend with Azure SQL holding all the data, there was tons of code to write and maintain, and when things did not work (a gist not loading properly for example), I had to debug the issue, which at times took away from building content. So with this criteria, I decided to adopt the following implementation for my blog:
- Blog will be a Static Website (plain HTML, CSS, JS)
- Blog will be deployed to Azure Blog Storage for hosting
- Site will utilize a domain purchased through Azure DNS
- Azure CDN will be configured to serve site as efficiently as possible
- CloudFlare will direct traffic to site in certain scenarios
- CI/CD will be configured using Azure DevOps to push commits to Blob Storage
This implementation satisfies all my criteria, and was fairly easy to setup. Also because I am hosting my app in Azure Storage, the costs for hosting is very cheap, tbh the most expensize thing in this implementation is owning the domain, which is like $10 for a year. So let’s take a look at how I did this.
Creating the Blog
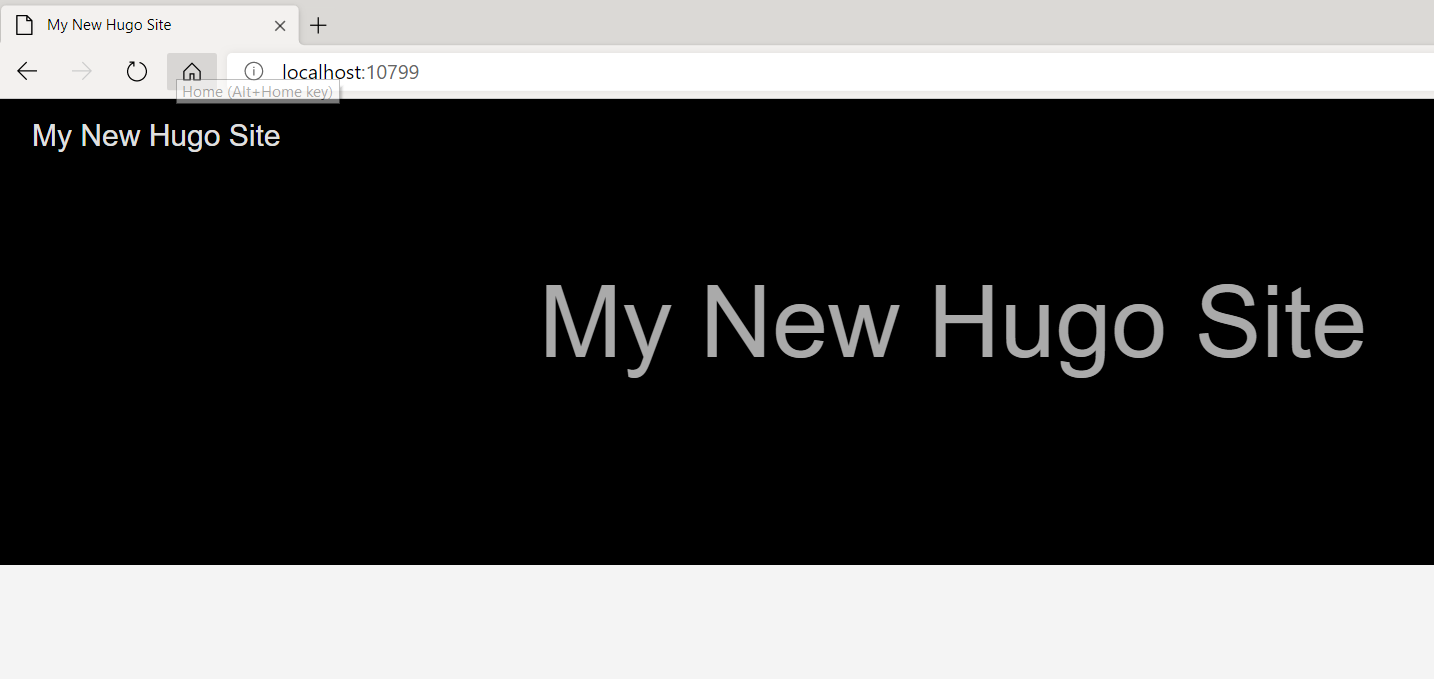
With the requirement that the blog needed to be a Static Website, I had a few options. I could just create a bunch of HTML files and organize them in some way, but that seemed pretty time consuming to build from scratch. I could also “steal” a blog template and change it per my needs, but I was still in a weird place where I would have a ton of static files that would need changing, and I am first to admit I have 0 design skills. I eventually decided that a Static Site generator would be ideal as they are feature-rich and easy to modify to your needs. There are tons of options in this space, and I landed on using Hugo which uses the Go programming language under the covers to build a static site from markdown files, which is ideal for me because I love markdown. The quickstart for Hugo is great and following a few steps, I had a site that I could view via localhost
| |
At this time, Hugo will spin up a local server on a random port. Navigating your browser to that url shows your site with your first page
Ok well that is pretty cool. I am not going into a ton of detail into how I configured Hugo to build my blog as that isn’t really the point. At this time we could just put it in the Cloud and be happy. One thing that I will call out is that I did create a Contact Me page where I use an Azure Function to send me an email, which I blogged about already. So now that we have a site “built”, let’s get it into the Cloud!
Configuring Blob Storage for Static Sites
I mentioned that I wanted to have very cheap hosting, and Azure Storage has a great feature that allows you to host Static websites at no additional cost, which is great because storage is very cheap if you don’t have a large amount of files. The process is super simple, you create an Azure Storage account, enable the feature on the storage account, and that is it. You can do this via the Azure Portal, or via the Azure CLI. Once you enable the feature, you just specify the default index and error page and you are done.
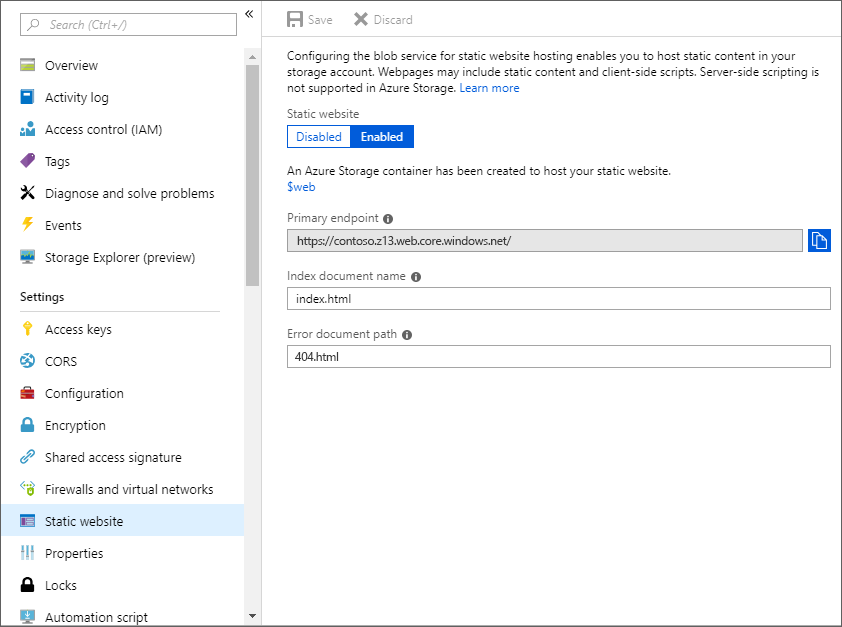
At this time, your site is live, and if you upload your built site (building a site is done via hugo -d built-site -v) to the $web container of the Blob Storage account, your site will be on the internet at the URL specified in the primary endpoint property.
Configure Azure Hosting, DNS, CDN and CloudFlare
So we have a site that is available on the internet, but the URL isn’t that good, so obviously the next step is to make the URL of our blog something more user friendly. You can use any hosting and cdn you want, but I wanted everything in Azure for simplicity sake. There are some great docs on this, but basically the steps are as follows.
- Use Azure CDN to access blobs with custom domains over HTTPS
- Configure a custom domain name for your Azure storage account
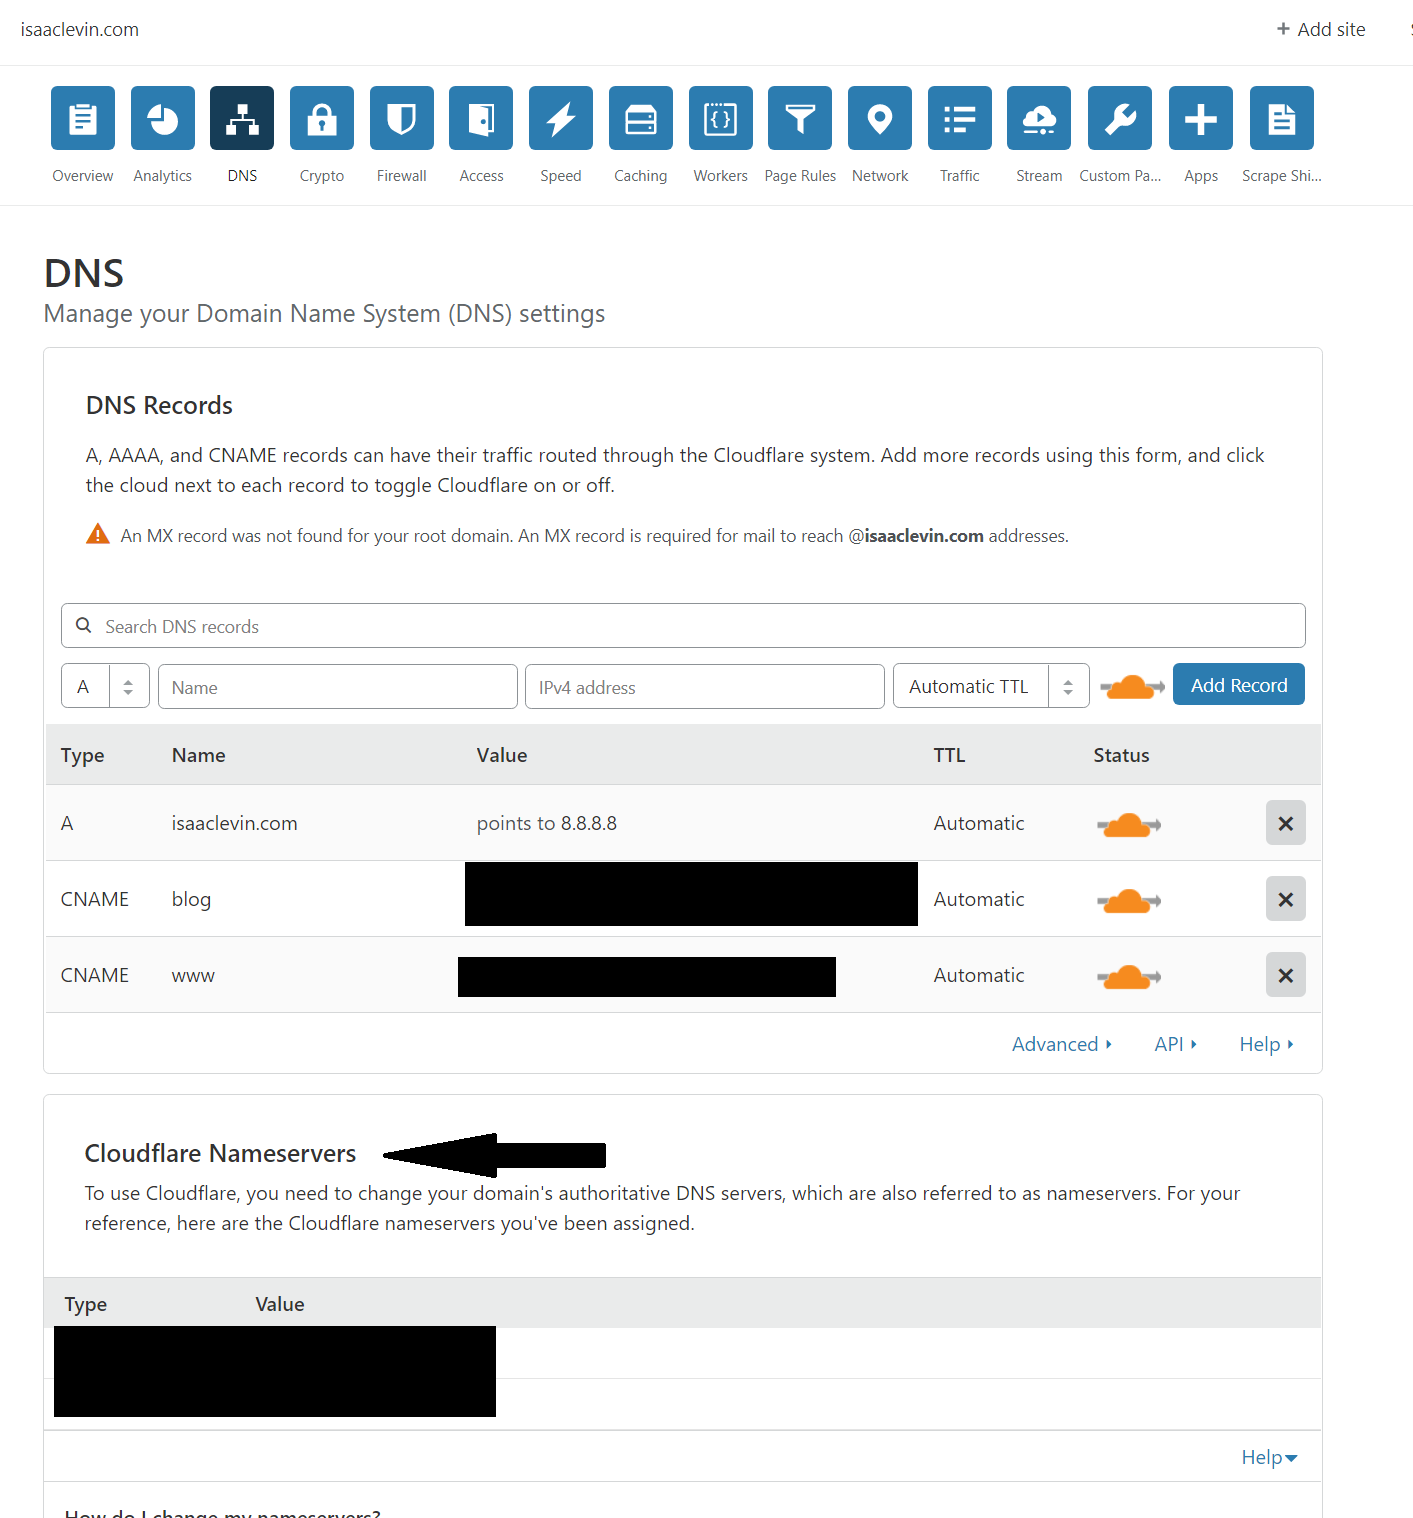
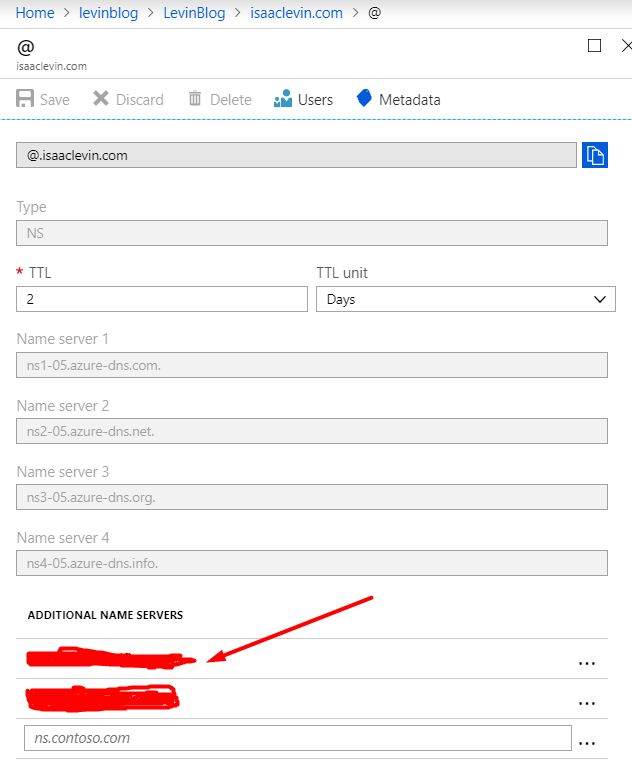
After this setup, you have a custom URL that redirects traffic to your cahced version of your static site using Azure CDN, and you can stop there. One additional thing I wanted to was put CloudFlare in front of all this to add an additional layer of resiliency and SSL for my site traffic. To configure this, you just need to add the CloudFlare nameservers that you are given when you create a CloudFlare (free) account to your additional nameservers in Azure DNS
Ok, now we have a custom domain that routes traffic with CloudFlare and it has Https support. Finally, we need to ensure that Url Rewriting is configured properly withing Azure CDN to ensure all the traffic get redirected to the correct routes. Here is a StackOverflow question with a ton of great content on Url Rewriting Rules.
My Blog on DevOps
I have a site that is currently in Azure, has a custom domain, routes appropriately to Https and has A and CNAME record support. We could be done here, and when we want to add content, we can just make our changes, build the site, and move the files to Blob Storage using something like Azure Storage Explorer
, but there has to be a better way to get my changes to my blog that is both continuous and easy. Good thing there are tools for that!
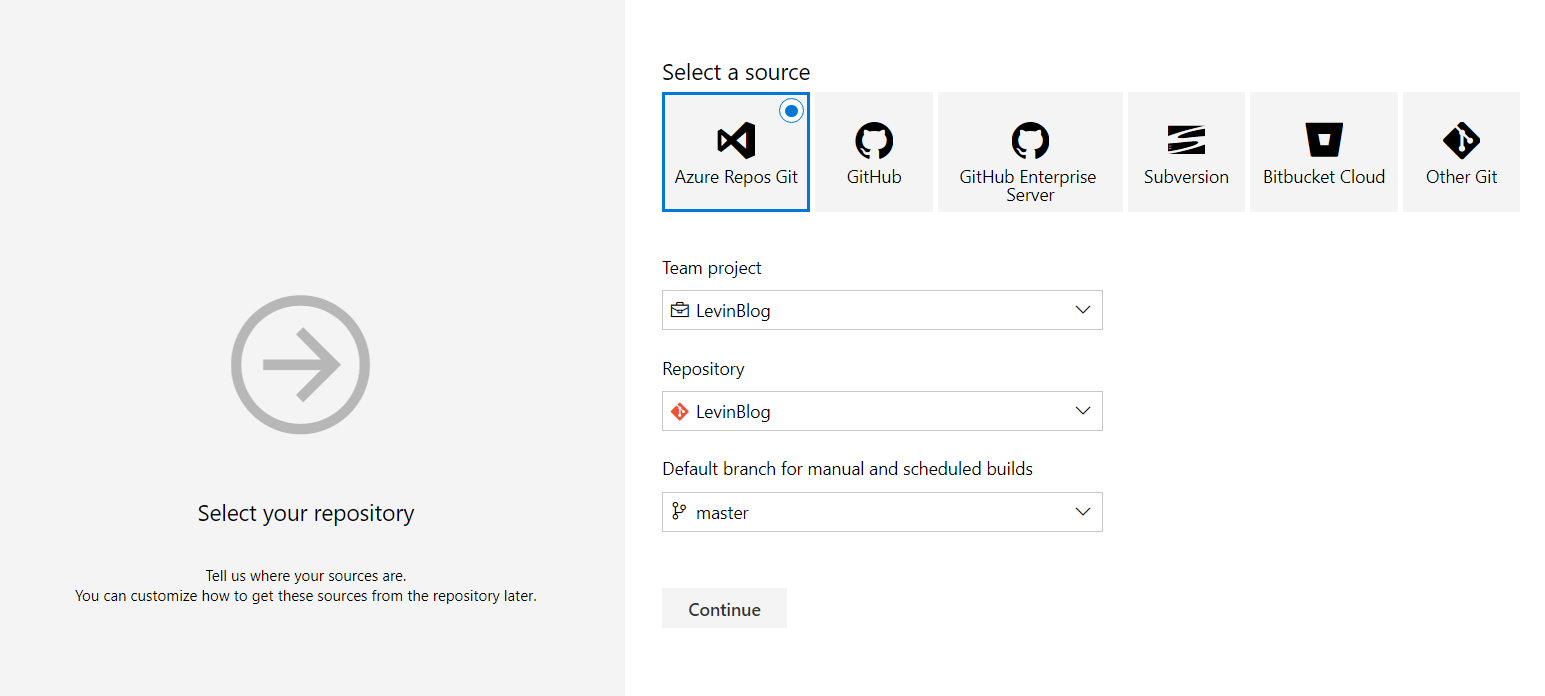
I want to be able to make changes to my blog and trigger a publish to Azure Blob Storage. To do this, I will use Azure DevOps Repos and Pipelines to store the content for my blog and when I make a change and commit, it builds the site and deploys it to Azure Blob Storage. I could have my site stored in GitHub and still use Azure Pipelines to build my site, I just chose Azure Repos for simplicity. Setting up my Azure Pipelines build to be triggered when I commit to my repo is as simple as creating a Build Definition in Azure Pipelines, selecting my Azure Repo and enabling Continuous Integration (CI).
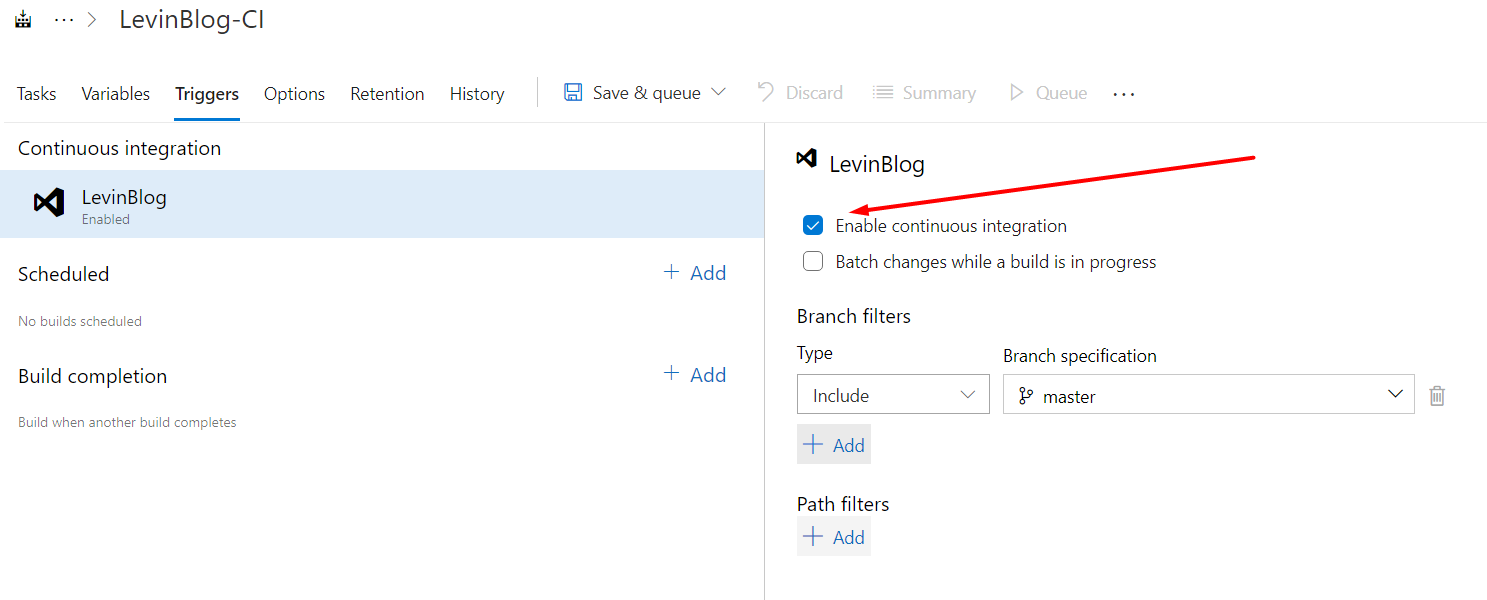
So now whenever a commit happens in my master branch, my build kicks off. So the question is, what needs to happen in my build to get my site built and deployed. Since Hugo requires to be installed on the machine that builds your app, we will need to configure the Hosted Agent to download and install Hugo.
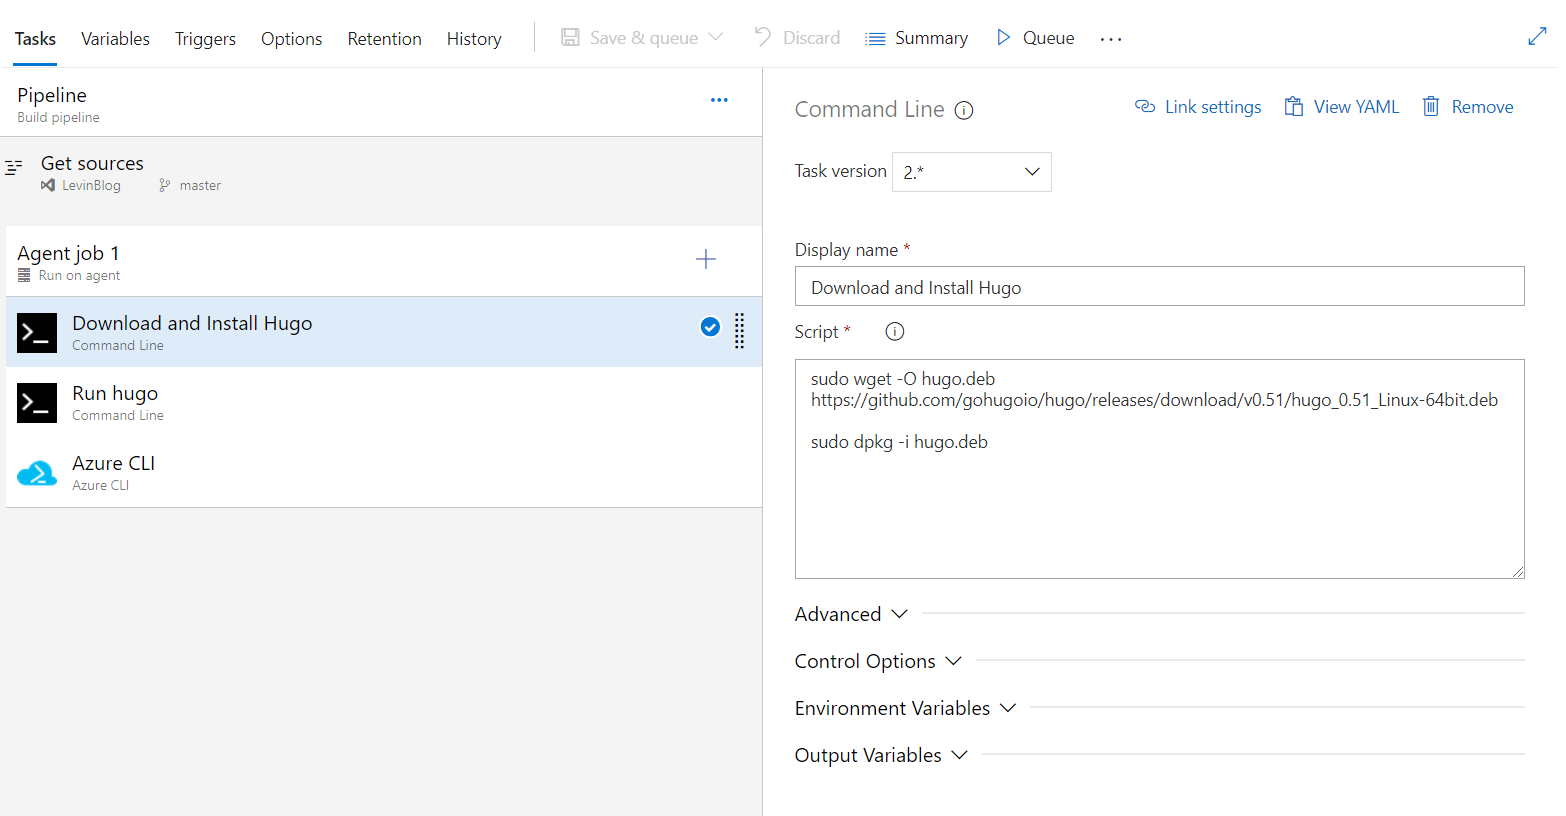
The screenshot gets the installer for Hugo and installs it using wget and dpkg . One thing to call out is that my Hosted Agent is Ubuntu (Hosted Ubuntu 1604 to be exact) so these commands are installed by default. After this, we need to run hugo against our repo to build our site and finally deploy it to Azure Blob Storage via the Azure CLI.
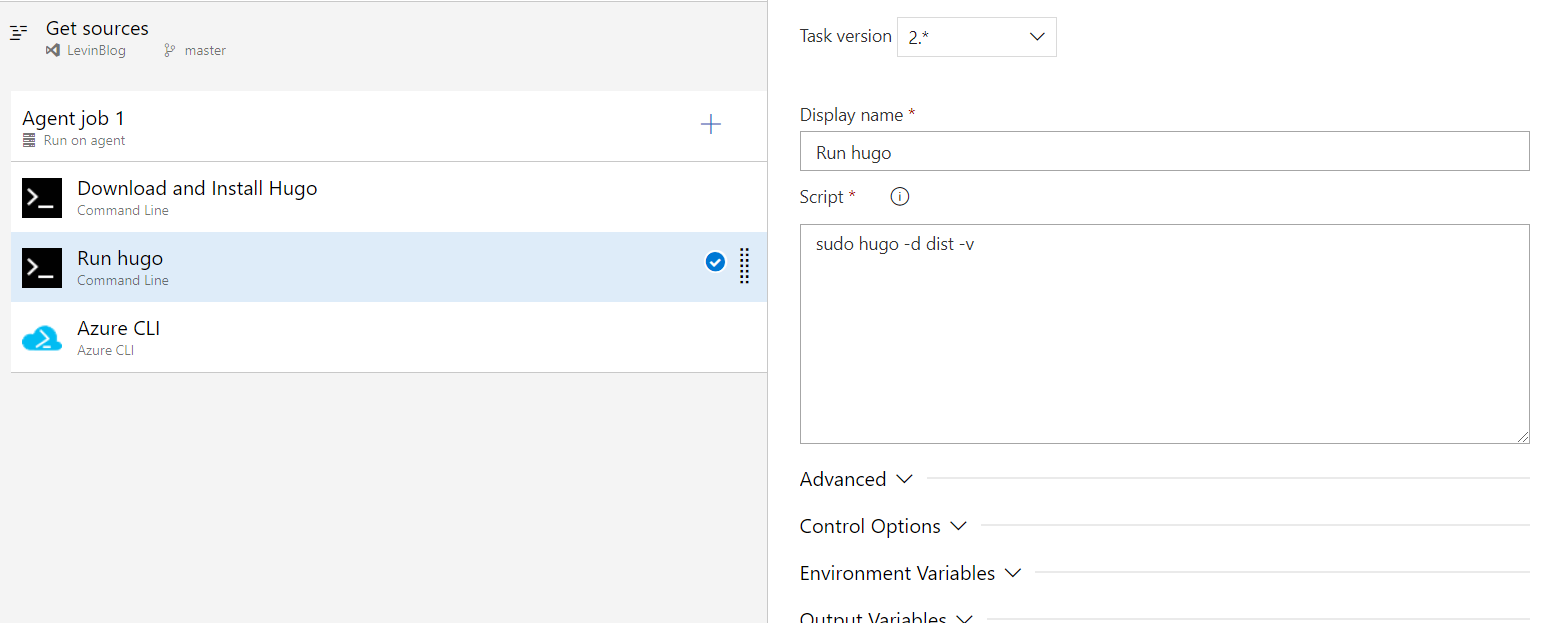
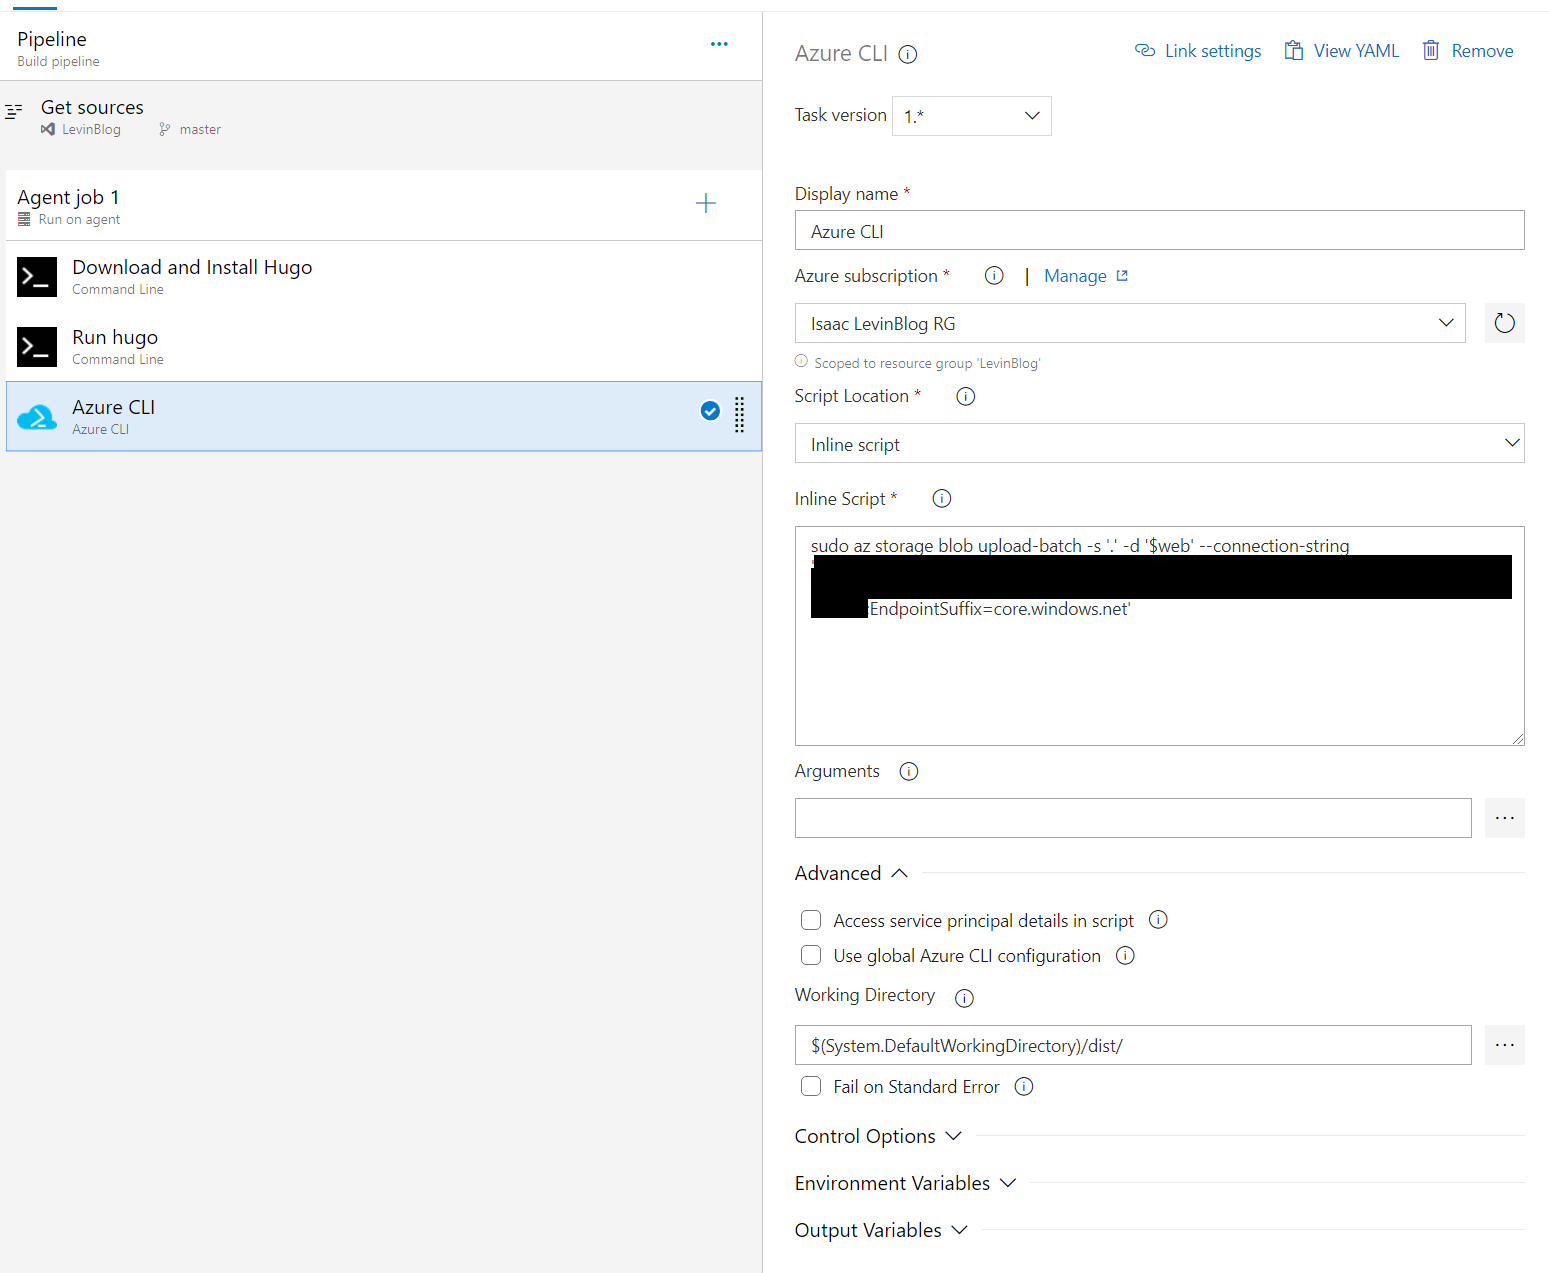
First screenshot is pretty simple, it builds the server to an output folder called dist. The second screenshot is the Azure CLI task running a script to upload a batch of files to a particular Azure Blob Storage location, which requires the connection string of your blob storage account. The working directory that the script needs to run in is the dist folder we created earlier. You will also need to configure the connection to your Azure subscription, so your CLI script will run in the right context, which is straight-forward. Now everytime we commit, this build will trigger and our blob storage will be updated, which will trigger a refresh of the CDN and our content will be available via our custom domain!!!
## Now You Have a Blog, so go Blog!
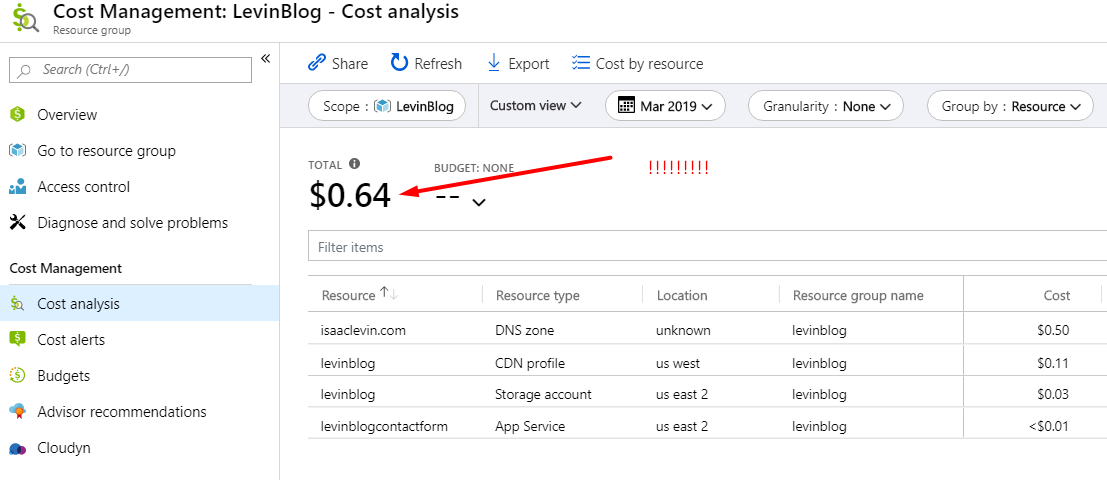
I hope this walkthrough was helpful and motivates folks to build a personal blog to share some cool things they work on. Finally to close on this, how much does this cost? Here is a screenshot of my bill for the entire Resource Group (Azure Storage, Function, DNS, CDN) for March 2019.